Siren (Internal) - Quick Start Guide
Siren (Internal) - Quick Start Guide
Hardware Overview
Pairing the Siren
To pair a siren onto the control panel, go into the Sirens section of the configuration.
- Put the panel into pairing mode by unlocking the receiver at the top of the page and Start Refresh at the top right of the screen (for more information on accessing this page, please refer to the Control Panel guides)
- Connect the battery to the siren and within 5 seconds of connecting the battery, press the tamper switch twice
- The siren will beep and/or flash 3 times confirming it is in pairing mode and will now show in red on the configuration interface
- Select the siren and go to the configuration page for the device
- Name the siren at the top of the page, scroll to the bottom and set an Area for the device
- Press Save at the top right of the page
- To complete the pairing process on the siren, press and hold the tamper button for around 3-4 seconds and let go
- The siren will beep and/or flash to confirm and will now be showing as green on the Sirens page of the panel configuration
Siren Configuration
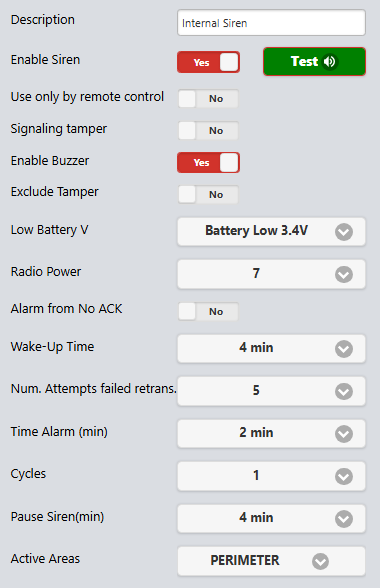
Configuration Overview
- Enable Siren - Triggers the audible siren upon activation
The "Test 🔊" can be used to perform a test trigger of the siren

- Use only by remote control - Allows Siren to be triggered through the livelink/alarm option on webeyeCMS (Siren will no longer activate automatically on system triggers)
- Signalling tamper - If any part of the system goes into tamper, the siren will activate (the first Siren paired to the system will ALWAYS trigger on system tamper, setting only applies to further sirens)
- Enable Buzzer - Enables the buzzer on the siren
- Exclude Tamper - Excludes the physical tamper on the device
- Low Battery V - Setting for when the camera will alert for low battery (default is 3.4v)
- Radio Power - Sets the power for the RF antenna in the device (if the device is mounted far from the control panel, ensure this is set to maximum)
- Alarm from No ACK - Siren will activate if communication with the control panel is lost
- Wake-Up Time - Default (Set to 4 Minutes)
- Numb. Attempts Failed Retrans. - Number of times it attempts to communicate with the control panel during comms failure
- Time Alarm (Min) - Duration the siren will activate during an intrusion/tamper
- Cycles - The number of times the siren will re-activate (e.g. TimeAlarm=2min, Cylces=3 - Siren will activate for 6 minutes)
- Pause Siren (Min) - Cooldown between cycles
Default Configuration
Installation
Ensure the battery has been removed before installing the internal siren. Screw the internal siren into a flat surface using any of the mounting holes. Once fitted to the wall, insert the battery and place the front cover onto the siren. Once in place, insert and fix the front cover by tightening the front screw.
Related Articles
Internal Siren
See attached documentationControl Panel - Quick Start Guide
Control Panel - Quick Start Guide This quick start guide will go through the different elements of the control panel. Hardware Overview Inside the control panel Locating Panel Serial/IMEI The control panel identifiers can be found on the packaging of ...Siren (External) - Quick Start Guide
Hardware Overview Pairing the Siren To pair a siren onto the control panel, go into the Sirens section of the configuration. Put the panel into pairing mode by unlocking the receiver at the top of the page and Start Refresh at the top right of the ...External Siren
See attached documentationInternal PIR Detector - Quick Start Guide
Internal PIR Detector - Quick Start Guide Hardware Overview Pairing the Detector To pair a PIR detector with the control panel, go into the Wireless Sensors section of the configuration. Put the panel into pairing mode by unlocking the receiver at ...